As my chicks grow...

And as I find more time to get creative, I thought I would share some of my creations, as well as my time with others. Hopefully I will make new friendships and create lasting bonds over paper, adhesive, and embellishments. So sit back, relax, and let's share...have a cup of coffee, or tea, or in my case a Coke...lol... and let's just have a blast creating, finding new projects to make together, and gathering our supplies for future endeavors!

Thursday, July 28, 2011

The Robins Nest Design Team post....Christmas in July

It is time, again, for my DT post....so thankful and blessed to be on the team for The Robins Nest.
 I love the papers so much, and the dew drops, omgosh! These are so awesome!!! The Robins Nest is an incredible store, and they treat their DT so good!!!
OK, on to my layout I made for the day...
Sorry about the glare, couldn't get around it today...
So, for the base I used Red Swirl Glitter Cardstock ....TOTALLY love their CS and Papers!!! The quality is incredible! I trimmed the photo (it was an 11x14...who needs one that big! LOL) to about 11.5x11 and decided not to matte it. I wanted to really make the photo the center of the layout and the Red Swirl really made it pop!
I used one of the Red Glitter Journalling blocks to write my title and added a little more bling (and class ;)) by adding Cotton Candy Dew Drops in pearl to some of the swirls.

For the border on the left I used Velvet Ribbons in Black and attached it right to the edge of the photo. Along the left border of CS I used  Ace of Diamonds Dew Drops in Black, Red, and White. I used them to make stars along the left, alternating the colors.

I had so much fun making this! I love that The Robin's Nest papers and CS coordinate, and there are Dew Drops in colors to match them all!!!! So sweet!!!
Thanks for looking!
Kristin

Sunday, July 24, 2011

IDIC challenge #65

I love the challenge this week at IDIC challenge blog. Make a bookmark. I wanted to do some thing that I haven't done before....kinda step out of my comfort zone. So, I have 2 bookmarks to offer. Both are made from the single rose digital stamp from Robyn's Fetish Digital Stamps.
For the first one, a ribbon book mark. I cut a 12" length of ribbon for the purple and a 13" length of sheer ribbon in light pink. I printed out my rose in a wallet size on pink cs and shimmer cs. I fussy cut my rose from the pink and then colored it with copics (RV21 and RV23). I cut the stem (using fussy cut also) out of green shimmer.  I used a large scallop punch and cut 2 out of purple cs. I used a medium circle punch and cut 1 out of the same pink cs I printed the rose on.
I mounted the rose using glue dots, also mounted the pink onto the purple using glue dots. Then I mounted the stem using glossy accents.


I attached the ribbon to the back of the purple cs scallop circle (the one that had the rose mounted on it)and used a glue dot on both sides of the ribbon. I sandwiched the 2 purple scallops together with the ribbon in the middle. Then I threaded the sheer ribbon thru the 2 purple beads. I used Ranger's Glossy Accents to make the end of the ribbon stiff to aid me in the threading...lol...
And TaDa...a ribbon book mark! Keeps the page marked, and stylish too!

For my second bookmark, I cut a piece of purple Bazzill CS at 12"x3". I printed out 9 roses from each- purple cs, pink cs, and shimmer green cs.
I fussy cut all the rose blooms from the pink and purple, and all the stems from the green.  Then I used Spring Violet glimmer mist and sprayed all the blooms, both pink and purple. This made the purple ones darker and the pink ones a light purple.  I mod podged them onto the 12"x3" cs. I put the dark purple down first, and then the light purple, being sure to alternate and let some hang off the edges. I put a coat of mod podge on top and then put a rose and stem I pieced together on top of the other roses. I did this twice. One on top one on the bottom.
I mod podged it all again. I used Glossy Mod Podge for this as I wanted it to stay shiny.  After it dried, I stamped with a single rose all over the bookmark to give it depth.
And here it is:

Thanks so much for looking! Please, let me know what you think!
Mama Hen

Sunday, July 17, 2011

IDIC Challenge Animals

Hi! For my DT project with IDIC challenge blog, I made an altered block. This can be used as a photo holder, a decorative piece, or a photo cube.
I started with a piece of 4x4. Sanded, painted, and decoupaged my patterned paper (EK Success Phrase Cafe Baby Faces) on the block.
I used the bear from Art Fire, and awesome place with some great digis! I colored it with my copics and used my colorless blender to give it some "texture". I put stickles (Glam Pink) on her ears, muzzle, and feet.


I apologize for the state of my photos. My background was not available for the shots and I needed to get these posted. I will try to put some better pics up by Sunday night.
Please, join us at I Did It Creations and play along with the challenges! This week's winner will receive a $10 coupon! 
Thanks for looking!
Mama Hen

Friday, July 15, 2011

The Robins Nest Design Team...first post

Altered Box Project-First DT post

I was supposed to have this post up this morning,I am so sorry this is late...we have had some huge internet issues, and finally got it fixed...this evening.
I do have a project...2 actually I completed for today's post.
The first is an altered "box", maybe more like an altered mail holder.
Anyway, this is the pic of the box/holder before I started.

I wasn't crazy about the decoration, but loved the design...so I tweaked it...lol
For this project, I used barn red acrylic paint to basecoat the entire holder. And a second coat. Then, I got to the fun part!!!
I used Autumn Fleur from The Robins Nest on the three panels on the holder. I mod podged them on, this paper is AWESOME it didn't buckle or bubble under the mod podge like some papers do. 
After it dried, overnight, I mod podged on top and all over the entire piece. 
Then I got to the fun of it!!! 
I added rub-ons, The Girls from The Robins Nest and Dew Drops in Sunflower . I adhered the Dew Drops (which I LOVE)  with Dew Dew Glue. 
These are fabulous! They are the perfect size, and you just press the back of your Dew Drop onto the Dew Dew Glue spot and it sticks, then just stick it onto your project! Easy, peasy!
On to my other project...
It started out like this

Yep, just an ordinary 3.5 inch square block.
And it became....
This!!!
Here are a few more shots, of different sides.


I painted the block with Barn Red acrylic paint, as a base. Modpodged the same paper to it. Sanded the edges. And added rub-ons, from the same pack. I was able to do both projects from one pack of rub-ons, 2 sheets of Autumn Fleur double-sided design paper, and a few Dew Drops.
I plan to add photos to the block, will make a nice conversation piece!
I can think of so many different things to use the block for, besides pics! It can be made into a candleholder, a photo holder, or just a decoration in itself. I had a lot of fun making both of these projects.
Stay tuned...LOTS more projects coming with the wooden blocks, and a few surprises too!
Will be posting on the INCREDIBLY GENEROUS and FABULOUS design team package The Robins Nest sent me! Can't wait to share with you!
Thanks for looking!
Mama Hen

Sunday, July 10, 2011

IDIC challenge #63

I have a card today, made with images from Glitterbabe. This is my DT card for IDIC challenge blog

I am having computer difficulties and have been for the last week or so. Hopefully, all will be fixed in the next couple of days.
Meanwhile, I used a card from a set I got as a gift, I believe the set was from HSN. It was a Christmas scrapbook and cardmaking kit. I never used everything, so thought I would purge my stuff, and use what I have...so, here it is! LOL...anyway, I printed out my images in 3.5x5 for the flower and the sentiment. I used my Tim Holtz worn lipstick for the reddish tones on the flower, and my Stampin Up mellow moss for the green. I edged it in the mellow moss. I edged the sentiment with Worn Lipstick and then sprayed it with Scarlet Glimmer Mist.
I will post all links for products, once I get my internet repaired.
Thanks!
Mama Hen

Thursday, June 30, 2011

Just a quick hello...

Just want to let you all know I am here, haven't fallen off the face of the earth...just been crazy busy here with family stuff. Will be back on tomorrow with a project post!
Mama Hen

Sunday, June 26, 2011

IDIC challenge #61

For the challenge at IDIC challenge blog, I chose an image from Robin's Fetish, Christmas Trees.

To make this I used a piece of white cs cut to 7"x10".  I scored it at 5" and folded. This is my base card. I mounted a piece of blue cs (unsure of the company, as I get it in bulk from my LSS (love Art Tech Supplies in Greensburg, PA!) cut at 4.75"x6.75".


I stamped the background with the itty bitty background stamps from The Angel Company. Stamped it in silver (Colorbox pigment) and embossed with "Snowflake" by PSX (sorry guys, I believe they are not around anymore). Then, looking at the background it didn't seem to have enough sparkle for snow! So...I sprayed the entire background, and it was saturated by the time I was done, actually made the background ink colors start to blend, and I thought it looked a bit like a snow storm! I used Opalescent Spray Glitter by FloraCraft (again, not sure if this is still made, as it was in my stash for quite a while!).
I printed out my digi from Robyn's Fetish Digital Stamps. It is the Christmas Trees. I colored them with my copics (still loving them!!!) and sprayed the top and bottom with the same glitter spray. I created the sentiment on OpenOffice and printed it out in two lines. Sprayed it with the glitter spray also.
I really wanted to have a clean, crisp looking card. I love the Christmas Trees, and can't wait to use them again...I have a Christma Project in mind for them....keep watching, you may see these trees again in the near future!
Thanks so much for looking! And please, don't forget to check out the projects on my fellow IDIC challenge DT! All their blog addresses can be found on my sidebar!
Mama Hen

Saturday, June 25, 2011

2 Layouts for Scrappin n Chattin challenge

So, I signed up to participate in a challenge over at Scrappin-N-Chattin. It was a 24 hour challenge...all was going fine, until I got a phone call.One of my "little" brothers had locked his keys in the car and hubs and I were the only ones he could get hold of...lol...so, here I am, inky fingers and all, riding with hubs (who has a slimjim, as he was a mechanic) to the gas station to rescue my lil' bro...and the slimjim didn't work. UGH! An hour and a half later I make it back home and now the deadline has passed for the challenge. It is all good though. It was still great to get my scrappy stuff out and actually scrapbook...I have been making cards and doing a lot of altering items, but not much scrapping!


I had to use the Savor collection from Little Yellow Bicycle.
I had this sketch to follow...


This is what I did first...


As you can see, I forgot about the sketch part...lol...so, after the drama...I came back home and started again...lol
And this is what I came up with...

Now, I am still not thrilled with my flower placement...but all in all, I think they turned out great! And getting pics from almost 9 years ago scrapped is an awesome bonus!

Thanks for looking!
Mama Hen

SO EXCITED! Awesome News!!!

I made the Design Team (The Robin's Nest) that I tried out for....the one that I posted about this past week! WOOHOO!!!! So incredibly excited! They have such awesome papers! And so many other incredible products! Please check out the website The Robin's Nest and check out my projects (as well as all the other AWESOME designers!!!) at Chattering Robins Blog. This is the FIRST Design Team for Robin's Nest, so I am so honored and just so excited to be chosen by them!!!
Thanks so much to Terri at The Robins Nest for choosing me!
Mama Hen

Wednesday, June 22, 2011

Someone needs your help!

This is not something I ever do, but I really want to see her dream become a reality. My daughter started a program to fill bags for children going into foster care. We are in the process of requesting non profit status,but it is expensive. So, we have a wish on Wish Upon A Hero that explains a little more about what we are doing and there are a few options for making a donation. Please consider supporting this venture. 100% of monies raised will be used for Gracie's Wish. The link for the Wish Upon A Hero is http://www.wishuponahero.com/wishes/?id=950971 She would also be blessed if you became a fan of the page Gracie's Wish on Facebook. Also, if you have any questions, please email me privately, I will be happy to answer!
Thank you and God Bless,
Kristin

Sunday, June 19, 2011

Project for DT tryouts!

 The Robins Nest

Hello!
I am trying to get on the DT for Robin's Nest. Would LOVE to work with them! So, I made this mini album for my project! AND as it turns out...it also qualifies for the Decorate to Celebrate Blog Challenge
and
Made It Myself Mondays
I used one of my favorite PP collections, We R Memory Keepers, Old Glory for all of the pages.
I repurposed a plastic Sizzix case for the mini case...gotta love recycling (or in this case, upcycling!)
I used 2 sheets of red cardstock from JoAnn's. I measured the width and the height of the box and subtracted 1/4 inch for each page. I cut the paper into strips that were almost 5 inches high.I scored the paper at 3 inches. Every 3 inches in width. I attached 2 sheets together to get one long sheet. 

The front is covered with the 4th of July from the Old Glory collection. I sanded, then inked (with Tim Holtz, Old Paper) all the edges.

I did the same with the back.

For this page I used a sheet from the Old Glory collection. I rounded the corners with the 1/4 inch We R Memory Keepers Corner Chomper. I then inked all the edges and mounted them on a the second rectangle, or page, as the first is attached to the inside of the box. I tore a page from an old dictionary keeping Freedom as one of the central words. I tore all edges. I inked all edges with first, Old Paper, then Brushed Corduroy. I crumpled and reinked the paper to get all the wrinkled inked. I sprayed it with Tattered Leather Glimmer Mist, Sapphire Glimmer Mist and Scarlet Glimmer Mist. I also sprayed a scrap piece of lace with the Tattered Leather Glimmer Mist and the Sapphire Glimmer Mist. I attached the lace into a loop with a piece of Scor-Tape (LOVE this stuff!)

I used a piece of PP from the same line, rounded the corners, inked all edges. Mounted to the base page. I used a journal page from the coordinating 4x6 pad (albums made easy pad). I tore the page in half and inked the edges and into the white part of the page with Old Paper ink. I inked the ribbon with Old Paper ink to age it.


I am not sure why the last pic turned out so dark here...all were taken in the same lighting and at the same time...working on fixing that!
I inked the edges of the main page, and rounded the corners (rather, rounded the corners, then inked...lol)
I used a sheet of paper from the same 4x6 pad as used above, tore it into 3 pieces (not the same size, just eyeballed it!) Inked the edges of all with Old Paper ink, sprayed one half of the first 2 with Tattered Leather Glimmer Mist, one page on the bottom with Sapphire Glimmer Mist, one page on the top with Scarlet, and the 3rd page with all three. I sprayed the flowers with the same Glimmer Mists to match.
Again, not sure of how the lighting made it look orange...LOL..but this is the other side of the mini album.
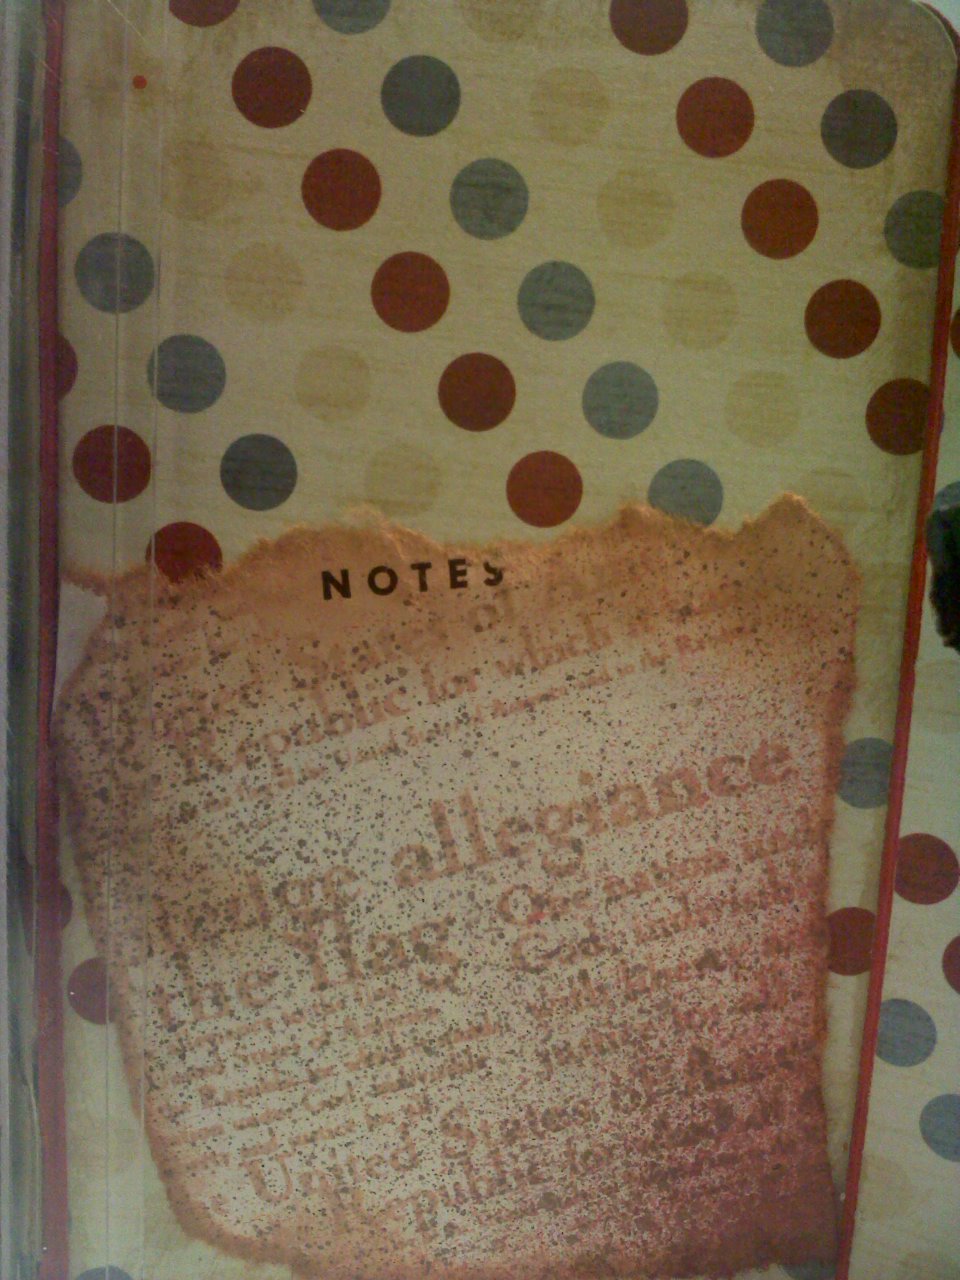
I tore a page from an old book, in the back that just said NOTES at the top. I stamped it with Allegiance To The Flag, but all my stamp says is H in a box....so, not sure the company name. I stamped it in Brushed Corduroy.I inked with both Brushed Corduroy and Old Paper. I sprayed it with both Scarlet and Tattered Leather Glimmer Mist.  Mounted it on a PP from the same collection by We R Memory Keepers.
I again, mounted, rounded and inked the PP. I took a cream colored Prima Flower from the Neutrals pack and crumpled, inked, and sprayed it with the same inks (Brushed Corduroy and Old Paper),and  Glimmer Mist (Sapphire, Scarlet, and Tattered Leather). I attached small rhinestones (blue) to the center of the flower and mounted it with dimensionals.

For this page, I used a small piece of coordination PP from the same collection to make a pocket. I inked it with Old Paper. For the tag I used a page from an old book (page is blank). I inked the edges with the Old Paper ink. I sprayed it with the Scarlet, Sapphire, and Tattered Leather Glimmer Mist. I also sprayed the ribbon with the Sapphire and Tattered Leather Glimmer Mist to age it.
For the last page, I used a page from a Thesaurus (chose American for the central word) and inked and crumpled and sprayed it (this time ONLY with the Tattered Leather. I used off white mulberry flowers from Petaloo and sprayed them with Tattered Leather and either Scarlet or Sapphire.
I sprayed a piece of lace with the Tattered Leather and the Sapphire to age it.
Thank you so much for stopping!
If you would, leave me some love!
Mama Hen
Hello!!! This is my first post for my first Design Team I have been on! I am soooo excited!
So, the theme at IDIC challenge blog this week is 70's Retro and the sponsor is Digis With Attitude.
I had a blast making this card! I used the napkin and cling wrap technique I talked about a few posts ago.
I colored my Hippie Teen with Copic markers. They blend soooo nice! It is pretty easy to make a tie-dye look with them!


 I used Prima Flowers (not sure of the collection, but they come in a round tin with a clear lid) and my bling was from Micheal's dollar bins.

Thanks so much for looking! And please, check out the rest of the DT projects...they all did an awesome job!!!
Mama Hen

Friday, June 17, 2011

Tuesday Trigger

Ok, so I LOVE the colors in the Tuesday Trigger! They are super cool...and summery! I made a card for a blog hop I was in...and it is so much based on this pic!
LOVE the new technique I learned using saran wrap and a napkin! Please, please, please, check out Terri at Ramblings of A Texas Craftroom . .. She has such an awesome tutorial!
This is where I got the idea from...so glad I found her again!
Thanks for stopping by! And don't forget to stop in and check out my project for IDIC challenge on Sunday!
Mama Hen

Saturday, June 11, 2011

School's Out for Summer Blog Hop Day 2

Hello, and welcome to day 2 of our School's Out for the Summer Blog Hop!!! You should have come from DoBea's Blog....if not, and you want to start at the beginning (lots of AWESOME projects!) head on over to Jessica's Blog.
Today, I made a card using this AWESOME new (to me) technique I just saw on one of the blogs I follow...and ya know, I cannot remember who's it is!!!! IF you know or it was you, please leave me a message and I will post a link to your blog to give you proper credit (and so EVERYONE else can see your AWESOME tutorial!
I used a piece of Bazzill  smooth cs white for the base, cut to 6x12, scored at 6. I mounted a piece of orange with white dots (have no idea who the maker is, have had this in my stash for over 5 years...lol) sized 6x6 to the card front.... Mounted a piece of pink Bazzill  cs cut at 5 1/2 x 5 1/2. Then, the fun part!!! The image is a napkin, using the technique I just learned (I can tell you it uses card stock, cling wrap, a napkin, and an iron) I mounted the napkin onto the white cs (again, Bazzill). I fussycut the image. I used ribbon from Michaels and my LSS to make the bow. Mounted the image using foam tape. The sentiment is from My Pink Stamper, I believe...lol....

A close up of the card front and sentiment.

I used the same technique for the inside, cutting from the napkin again and using ribbon for the border. Left the center blank for someone to write a message of their own!~

Thanks so much for looking!!!
Mama Hen